photoshop morphing- crocofrog
|
||
|---|---|---|
|
original frog
|
original crocodile
|
|
| progress
1. get your images
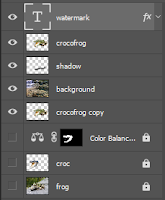
2. size down the frog image to 1024 pixels in width 3. remember to rename your layer too frog 4. now that we're done with the frog image we go to the crocodile image 5. don't forget to rename the layer to croc or crocodile 6. now for the most time consuming step, erase the background of the croc picture 7. we also don't want the neck so erase by the jawline 8. now quick select the cut out of the croc head 9. go to the refine edge and play with the values until you like how it looks, try to make it look like its not cut out 10. deselect the image and now were ready to move the head to the frog 11. ctrl a, and ctrl c, to copy the head and ctrl v, to paste it onto the frog picture 12. ctrl t, to select the croc head 13. hold shift and scale down the croc head and move it around to fit the frog, then press enter when your done 14. select your clone stamp tool and hold down alt on the area that you want to clone 15. now lets get rid of the crocs eye by left clicking on it 16. now just like how we covered the crocs eye with the clone stamp tool, we will blend the crocks skin with the frogs on the face and jaw 17. now with the eraser tool we will erase the croc by the frogs eyes to open them up more 18. now go back to the quick selection tool and select the crocs head again 19. now go down to the, create new fill adjustment layer, and choose color balance 20. with midtones selected, drop the red to -13 and the yellow to -98 21. now with the eraser tool erase the mouth and teeth to its original color 22. use the burn tool to add a bit of shadow to the jaw 23. then use the brush with the opacity of 81% to create a shadow under the crocs mouth, make sure your on the frog layer for this part! 24. you can change the background like I did just by cutting out the frog from its original picture and adding a new background pic 25. add your water mark and now were done! and here is a link to the tutorial video if my instructions weren't clear enough or its just easier to watch a video: https://www.youtube.com/watch?v=ll24Q5lS7zo |
||
Thursday, February 13, 2020
Photoshop Morphing - CrocoFrog (infotech12)
Subscribe to:
Post Comments (Atom)


No comments:
Post a Comment